Hot Air Soldering Iron
An easy DIY project on a college student budget
Note: This project was originally done back in 2005. It's a little dated now and not really very hiqh quality. It is, however, preserved here for your reference.
Also, you may want to check this project out on instructables: http://www.instructables.com/id/DIY-Hot-Air-Soldering-Iron_1/
This project stemmed from the desire to remove (and perhaps one day re-solder) surface mount components. In it's entireity (pictures and all), it took less that two hours and $20. Even if you have to buy everything, I believe the cost could easily be kept under $30. Comparatively, I could not find a hot air soldering iron retain for under $200. Every entrepreneuring young electrical engineer needs to work on some project to satisfy curiosities and take things apart... right? Well, at least I do!
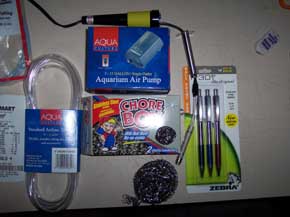
| First, the items purchased from Wal-mart. In order from left-right, top-bottom: Aquarium air tubing: $1.13 Aquarium air pump: $6.97 "Chore Boy" Stainless Steel scrubber: $1.37 "Zebra F-301" pens: $4.73 Total: $14.20 Other items needed: Super Glue Soldering Iron, 40 Watts or higher Silicone Fuel Tubing (see below) Even buying the above three items, the cost of this project could easily be kept under $30. Tools: Screwdriver Scissors Dremel (or similar drilling/grinding tool) |
 |
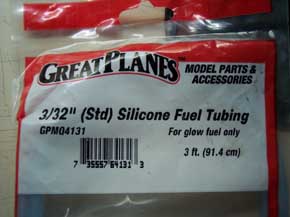
| The final push to start this project came from Daniel Hartman's hot air pencil project. In his project, Dan used silicone fuel tubing. This is used as a fuel line in model airplanes, it's reasonably cheap and I'm sure you could find it easily at a local hobby shop or from Froogle. Fortunately for me, Aerospace Engineering is big here at MSU, so it wasn't hard to find a friend that didn't mind giving me some. Feel free to come up with a substitute for this if you can - but this stuff seems to hold up extremely well to the heat of the soldering iron. |
 |
| This is what you get when you take a soldering iron apart: a handle, a simple resistive heater, and a sheating to protect the heater (or protect other things from it). The tip has been removed in this picture. The nut shown at the far right side of this picture holds the soldering iron tip in by a small lip. | 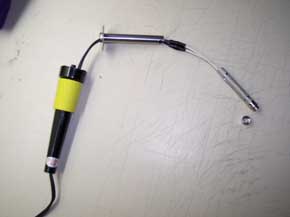 |
| Luckily, the entire thing is hollow! Every single part of it - including the heating element. It's almost as if this thing were made to be modified. | 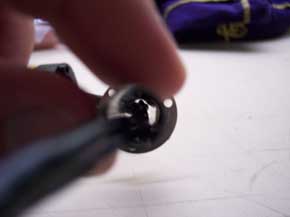 |
| In order to effectively heat the air, we have to do something to increase the surface area it passes over. I was hoping to use copper rather than stainless steel for this; but I couldn't find any copper scouring pads. The closest thing available was the "Chore Boy" stainless steel scouring pads. I feel however, that if it were available, copper would be superior. As you can see in the picture, simply stuff a few strands into the end of the heating element. Be careful not to get too much. You should test blow into the end of the heating element and make sure air still flows relatively unobstructed. | 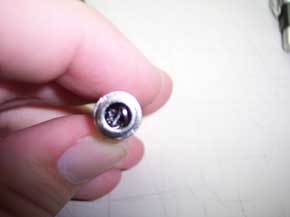 |
| Simply push the silicone tubing into the end of the heating element. You can't see it in this picture, but I sealed the end firmly using scraps of silicone tubing and super glue. This part is relatively vital - I had to go back and make the improvements mentioned here - without them the soldering iron loses a lot of air from the back end and smokes a lot (although I could never find the source of what was burning). |  |
| I used a dremel tool to put a hole in the handle of the soldering iron, near the top. The hole the power cord went through was not quite large enough to accomodate both the power cord and the aquarium tubing. Your results may vary. | 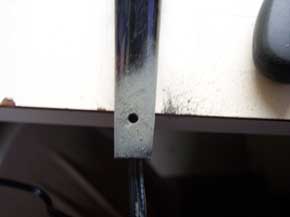 |
| This shows the tubing through the hole I created in the soldering iron. The placement of this hole actually seems superior to running the line straight out the back of the iron. The air flow can be crudely regulated with a little bit of pressure, pinching the air hose against the handle. | 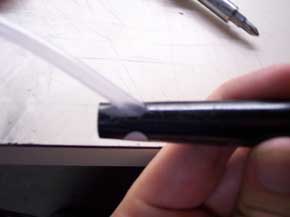 |
| This is how I attached the silicone tubing to the aquarium air line. I simply removed the tip from one of the pens, stretching the silicone tubing across the smaller end, and pushing the aquarium hose firmly into the wide end, securing it with a generous amount of super glue. These particular pens have a relatively wide opening at the tip - if yours aren't quite so generous, you may have to widen the opening a bit to avoid restricting the air flow. | 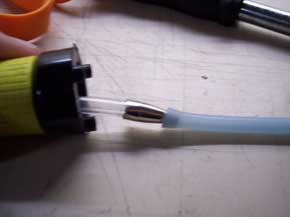 |
| After putting the soldering iron back together - this is what we are left with. What woud be a fully-functioning hot air soldering iron, missing only one small piece: the nozzle. Another pen tip is unscrewed and cut using the dremel cutting accessory shown in this picture. | 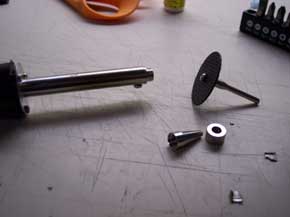 |
| This shows the pen tip after being cut in two. The idea is to get a tip with a wide end barely larger than the hole in the soldering iron's nut. This way the tip can rest on the outside of the soldering iron's male end, and fit securely when the nut is tightened on the modified pen tip. | 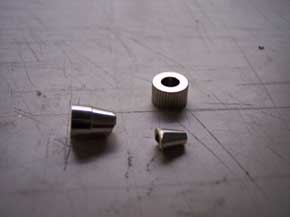 |
| This is the result after securing everything together. The tip from this pen seems to fit perfectly. I would recommend actually using a pen tip - as the mechanical pencils I found all seemed to have too small of an opening. Of course, it could easily be filed down to something wider. | 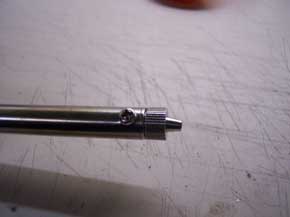 |
| This is the final result - a fully-functional hot air soldering iron on a budget and two hours or less of work. This project seems easy enough for anybody to do - try and build it yourself! | 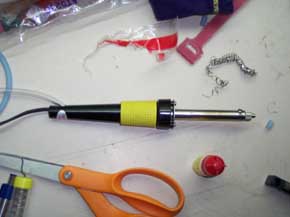 |
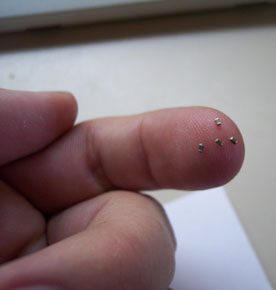
| Here are some inital results - these tiny devices are surface mount capacitors from a damaged network card. The soldering iron seems to work absolutely flawlessly. After waiting a few minutes to heat up, just turn the air pump on and bring it close to the device you want to remove. Using tweezers to apply gentle pressure against the device, it quickly loosens up and falls off. There you have it, a true DIY project for a college student on a budget. Light on both time and money, I found this project a worthwhile investment. Not only can it remove surface-mount components, but I found it works really well as a general use soldering iron because of its less-intense heat. For example, a transistor can be soldered in only a few seconds, without the need for the usual soldering heatsinks. For anything but heavy wires, this is a vast improvement over the soldering iron I started out with. |
 |
